Note for Microsoft email users: Microsoft is phasing out SMTP email. Please see our help page on setting up Microsoft Open Authorization (OAuth) email for SiteLink Web Edition and Corporate Control Center.
You can send emails from SiteLink by Storable to your tenants by setting up an email address defined from SMTP settings (provided by your email provider).
Follow the instructions below to set up emails to and from SiteLink:
1. From SiteLink Web Edition, navigate to Setup. |
|
2. Click E-Mail. |
Complete the information on the E-Mail screen. Each section of the screen is explained below.
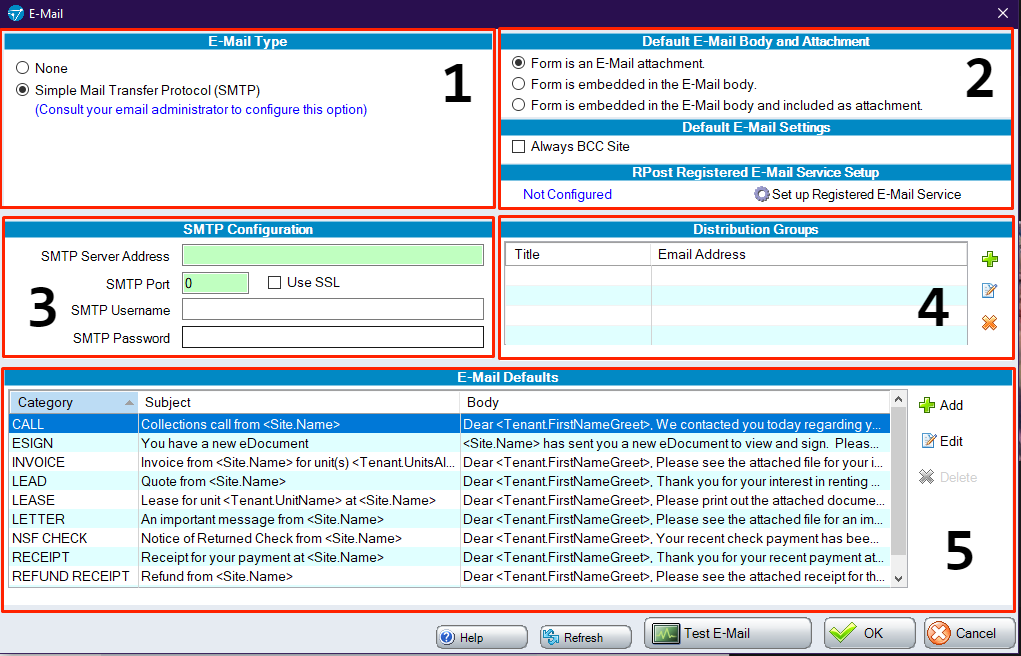
1. E-Mail Type
The E-Mail Type section lets you choose the method SiteLink will use to send emails.
None: Emails will not be sent from SiteLink at all.
Simple Mail Transfer Protocol (SMTP): This allows you to send mail directly from your email server’s address. Selecting this option will display Section 3 and let you enter your SMTP details. These details can be found from your email provider (usually your Internet service provider or an IT company that set up your IT).
Messages sent from SiteLink via SMTP will appear only in the Sent Items folder if the email is set up as an IMAP account. We recommend contacting your email provider to see if your email has been set up for this.
2. Default E-Mail Body and Attachment
The Default E-Mail Body and Attachment section defines how all emails will handle documentation, such as late letters or invoices, which are sent to tenants.
Form is an E-mail attachment: This will send out a PDF document attached to the email. This lets you use either a predefined email message (as shown in Section 5) or add your own subject and body content.
Form is embedded in the E-mail body: This will send the document included in the body of the email. You will still be able to use the predefined messages or your own content; however, the document will appear below your body content for the email.
Form is embedded in the E-mail body and included as an attachment: This option will do both of the above settings, putting your document’s message into the email’s body, as well as attaching it to the email in PDF format.
Default E-Mail Settings
The email address shown here is the one set under Setup > Company Information. This is also known as the Site Email.
BCC Site: Checking this box will send a copy of every email to the Site Email as well. The Site Email does not have to be the address you use to email tenants in SiteLink.
3. SMTP Configuration
SMTP settings are dependent on who hosts your email address. To get this information, please either contact your IT department or your Internet service provider if you use an email service such as Bigpond Mail. You can find information on the most common hosting setup in our article: SMTP setup by email provider.
If you're using Gmail, you will need to set up Google App Passwords and enter the 16-digit passcode in the SMTP password field. You can find instructions in our article: How do I use Google App Passwords with SMTP email in SiteLink.
4. Distribution Groups
Distribution Groups let you create a list of multiple email addresses to which you want to send reports. For example, if you need to send your daily deposit report to multiple email addresses, you can set up a distribution group containing all those addresses to simplify the process.
To add a distribution group, click on the + button and mame the group (for example, “Management"). If you are entering multiple email addresses in the group, separate them with a semicolon ( ; ).
5. E-Mail Defaults
E-Mail Defaults allow you to create email templates for different scenarios, such as when invoices are being sent. You cannot remove the default messages; however, you can edit them. New predefined messages can also be created by clicking the + button.
NOTE: When sending out emails from Company > Reprint > Forms or processing CRM or Past Due Schedule events, the email message will always default to your “Letter” email default. To send the correct message, you will need to select your message from “Predefined Messages.”
To test that you have set up your email correctly, click Test E-Mail at the bottom of the window.
You will confirm whether you want to send a test message and select which email address to send it to.
If your details are correct, you will see “Processing Complete. Email Status: 1 Sent, 0 Failed”.
If you see any other message, this means your email was not sent. A failed email could be caused by either incorrect login details (most common), an issue with the email server, or no Internet connection.