Discount plans can be used to give tenants free months, a discount off of one month, a permanent discount and more. You can specify when to apply the discount such as only applying to specific unit types, or only under certain occupancy thresholds.
To create a discount plan:
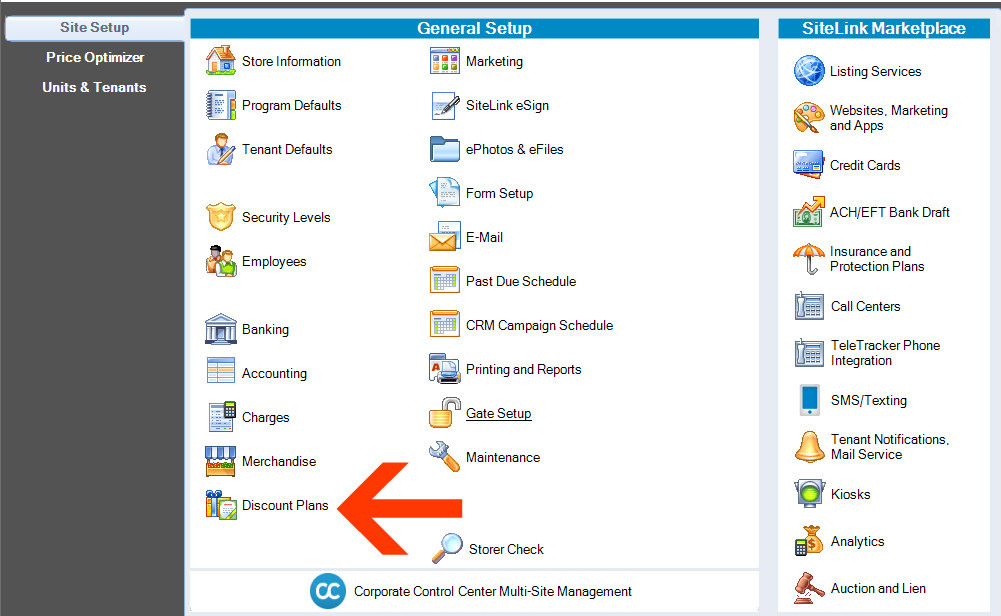
1. Navigate to Setup in SiteLink Web Edition. |
|
2. Click Discount Plans. |
|
3. Click Add on the right. | |
Fill out each section: | |
|
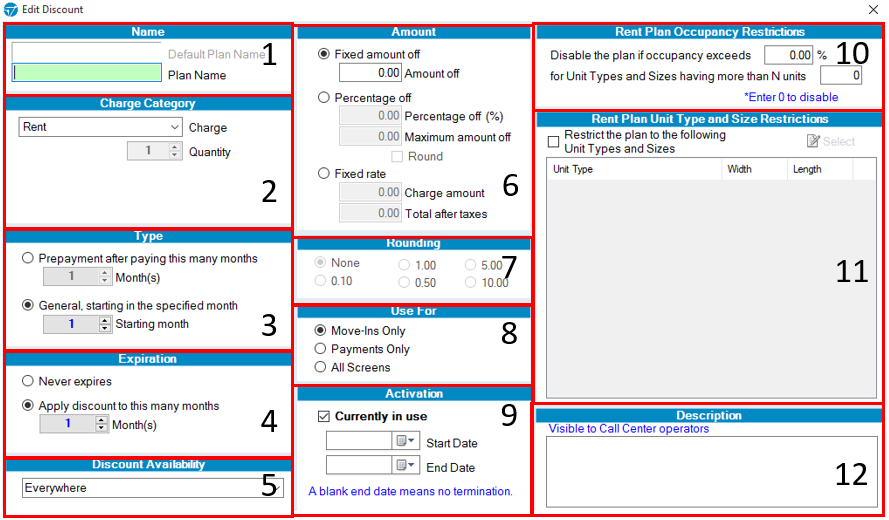
1. Plan Name
2. Charge Category
3. Type The Type option lets you choose how the discount is applied. There are two different options:
4. Expiration Expiration lets you set how long the discount lasts. There are two different options:
5. Discount Availability This limits the selection of where the discount is available. There are a number of options:
Selecting Everywhere is recommended, as it makes the discount available wherever your customer signs up. However, for example, you may want to create an online special available only on your website. 6. Amount This section lets you specify the amount of your discount and how it will be calculated.
7. Rounding If the Round option was selected in the Percentage Off option in #6, you can choose how the discount amount will be rounded (nearest $.10, $5.00, etc). For example, if you are offering a "13% discount on the first month’s rent" on a unit that costs $75, the discount amount would be $9.75. You may choose to round the discount to the nearest $1.00 so that the discount would be an even $10. 8. Use For This option restricts where the discount plan can be applied within SiteLink. There are 3 options:
9. Activation This option lets you choose whether the discount plan is available only during a specific time period. To activate the discount plan, check the box labeled “Currently in use”. The start and end dates let you choose a period during which the discount plan is available. For example, if you want to create a “Summertime Special”, you may set a start date of June 1st and an end date of August 31st. The discount will not be available outside of that time period. 10. Rent Plan Occupancy Restrictions This option lets you disable the discount plan for units with occupancy above a certain threshold and/or a certain number of units. For example, if you enter 90% in the field labeled “Disable plan if occupancy exceeds”, the discount would no longer be available if the unit group is over 90% full. If you enter a number in the “Restrict to Unit Types/Sizes with more than” field, the discount plan would only be available to unit groups with more than that number of units(total units). You can further restrict the specific units the discount applies to in the next step. Entering “0” in each box will disable this feature. 11. Rent Plan Unit Type and Size Restrictions You can specify unit types and sizes for the discount to apply to. Check the box in this section and then click Select. Check the boxes for the unit groups for which you want the discount to be available. All other units will be excluded from the discount. If no selection is made, the discount will be available for all unit groups. 12. Description Adding a description to the plan will help call center operators understand what it covers. You can put any information you want in here to make it clear what the discount plan offers. | |
Click Ok when you are done. |
|